Before I start talking about Canon 7D, I would like to mention that for the last few years I’ve owned and actively used most of the Canon average to high-grade cameras. For that reason my opinion on the image quality of Canon 7D is a proof based on the impressions I’ve been left using other cameras: Canon EOS-1D Mark II N, Canon EOS-1D Mark III, Canon EOS-1Ds Mark III, Canon 1Ds, Canon 1D 4.2 MP and Canon 5D Mark II.
Translated by Maya Golemanova
Canon 7D is not a high-end camera closely comparable to Mark cameras, but for the first time Canon has released a worthy and quite cheaper analog of the Mark cameras.
Due to the densely situated pixels (18 MP) at 1.6 crop factor matrix, the camera basically obliges you to use the best optics, which is ok, since most amateur and professional wildlife photographers use hi-grade tele-optics anyway. Even in Bulgaria, most of us already have high quality lenses for sports and wildlife photography – Canon 300mm f/4 L IS, Canon 500mm f/4 L IS, Canon 600mm f/4 L IS, Canon 300mm f/2.8 L IS, Canon 400mm f/2.8 L IS.
With such lenses Canon 7D can produce high quality images that even if previewed at full resolution looks great. I will use as an example a picture of a cormorant in breeding plumage, which was 30m away from the lens when I took the photo. The picture is full crop and I reduced it by its longer side from 1067 pixels to 950 pixels, which is a relatively small reduction. Although the cormorant is still wet and its feathers are quite greasy, the image is excellent. The picture is taken with Canon 7D and Canon 400mm f/2.8 L IS.
If for example you take pictures of a passerine bird 10 meters away from you at the most, the image quality will be even better. When printing images, image flaws hаve minor importance, compared to looking at them on the TFT screen. Printing full sized images on A2 format is perfect. I’ve printed pictures from Canon 7D to A1 format and I have no remarks.
When you take pictures with 7D of wild animals, especially birds, you should keep a few things in mind.
1. The most important one is the air perspective – with 7D it distorts the image quality to a higher extent, compared to taking photos with full frame cameras. That’s why, the perfect weather is the one with diffusive light. Bright sunshine usually comes with more haze, especially at the water level. The best pictures I’ve made were done in an overcast day with very thin clouds high in the sky and sunlight shining through them. In such cases, the haze is very low and you can take pictures even if objects are 50m away from you without bothering about the quality.
2. The shutter speed is next in line. If you’ve had 30D or Mark II N so far and you’ve taken sharp pictures at 1/1000 sec, with Canon 7D, you have to increase the shutter speed at least twice. This should be done because of the density of the pixels of the matrix. If in the case of Mark II N a certain twitch means moving the projections by a few pixels, then in the case of 7D the same twitch means moving it by tens several of pixels.
3. Thirdly, try to stick to the newest autofocus tracking modes (Servo AF) – Zone AF mode and Full 19-points automatic tracking mode by setting the initial AF point in advance. Since 7D has a separate processor for the Autofocus, the automatic choice of an AF point doesn’t slow down the camera performance. It even increases the number of the quality images while shooting action.
4. And last but not least, what works well for me is the use of the following camera settings:
C. Fn. III.1: Autofocus/Drive AI Servo tracking sensitivity. Set it to Slow mode – shift the scroll to the left. This means that if you are tracking the object and another one comes between you both, the camera will ignore the second one long enough and will keep tracking the main object.
C. Fn. III.2: Autofocus/Drive AI Servo 1st/2nd img priority set to point 3: Release/Tracking priority. This means that if you are in the heat of the action, the first shot will be taken instantly, regardless of the focus accuracy. From then on the priority shifts on to the precise focus and to accurately tracking the moving object. This would also slow down the framerate, if required. As far as I remember, this is the first non-professional Canon body which offers this function.
Here is an example of how C. Fn. III.2:3 works effectively in favor of the photographer:
Two weeks ago I was taking pictures of pelicans, lying on the ground in order to shoot from the lowest possible angle. While taking the picture, the lens was still on the video-head of the tripod. Nonetheless, panning with the lens was still difficult to perform.
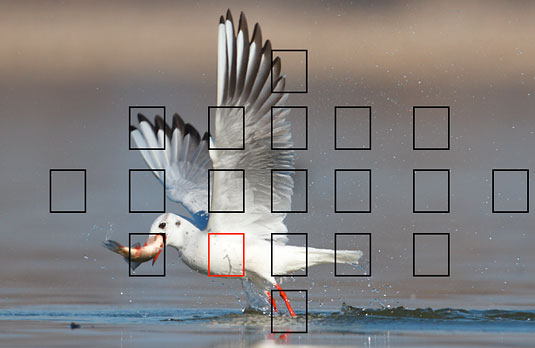
All of a sudden, under angle of 10 and very close to me, a seagull appeared and dived spectacularly in the water. I instantly pointed the lens into the black-headed gull’s direction, with the AF previously focused on a pelican 30-40m away from me. I pushed the shutter button as to focus on the splashing water, where within second the seagull was to appear and pulled the trigger immediately. And indeed, exactly at that moment, the gull came out of the water with a huge fish in its mouth. I haven’t seen a gull catching such a big fish in this lake for the last couple of years.
When I saw the images on the display, I was delighted as I had a couple of great photos. When I opened them with Canon DPP software and ran the focus points I noticed that the focus of the first picture was not confirmed by the camera, which means that it snapped the picture due to the fact that I had previously set it to C. Fn. III.2:3 that I mentioned above.

Canon EOS 7D, Canon 400mm f/2.8 L IS, 1/4000 sec, f/4, ISO 250, Manual mode, AWB, Zone AF AI Servo
The next picture was confirmed by the Autofocus and it was sharp at the focus point. So, I have two interesting frames – when the seagull comes out of the water and right above the water with the fish.

Canon EOS 7D, Canon 400mm f/2.8 L IS, 1/4000 sec, f/4, ISO 250, Manual mode, AWB, Zone AF AI Servo
This means that it took the Autofocus a split of a second to switch from the first to the second frame with precision.


March 8th, 2011 10:02
Евала ти. Много важен опит споделяш, а примера е фантастичен.
Поздравления за последната ти награда.
March 9th, 2011 01:38
Това е идеята, да споделям полезни неща за снимането, независимо дали говорим за фотоапарат, аксесоари, обективи, техники на снимане и т.н.
Радвам се че за теб статията е била полезна.
March 9th, 2011 13:19
Полезно!
Имаш правилен подход към нещата! Поздравления за наградата! Продължавай така!
March 10th, 2011 12:37
Много съм доволен от споделено, макар и да не ползвам 7д!
Трябва да поразкажеш и за големите матрици :)
Поздрави!
March 11th, 2011 11:56
Интересен и полезен текст!
П.С. Поздрави за сайта, с пожелания винаги да имаш какво да качваш и да тестваш на него!
March 11th, 2011 12:00
Благодаря :)
Ще има редовно и снимки и статии. Подготвям нови, само време не остава за сега …
January 23rd, 2012 20:07
Браво.Може ли консултация? веднага искам да заявя, че съм абсолютен лаик, но желая да си купя фотоапарат с който мога да правя макро снимки, на луминисцентно осветление,но така че да няма отражения по сниманите предмети. Нужно е за да се снимат зъби на пациенти в стоматологичен кабинет.Т.е трябва да има много точно предаване на цвета на зъбите. без отражения и отблясъци. какво да си купя като откровенно казано разчитам на 2000 лв. бюджет
Ще бъда благодарен за съвет!
January 25th, 2012 11:37
Привет,
доста трудна задача. Вярният бял баланс на подобно осветление е доста трудна задача, камо ли ако говорим за супер прецизно вземане на данни само по цвета на зъба от снимката.
Канон 7Д е скъпа машина за подобни неща, може и с едно 600д да се мине, т.к. снимките по-скоро ще са документални.
При всички положения една сива карта, с която да се взима верния баланс е задължителна. Аз като снимам предмети винаги взимам със сива карта белия баланс и после го задавам къстъм и така постигам завидна точност. Но не бих разчитал на кой да е апарат за определяне на полутоновете за правене на пломби, мостове и т.н.